New to Terraform? Start here
The Latitude.sh Terraform provider supports importing existing infrastructure into Terraform. This feature is useful when you want to add existing Latitude.sh resources to Terraform to start managing them with code.
Before importing your resources, it helps to understand how Terraform keeps track of your infrastructure.
Terraform maps the attributes and metadata of your resources to its internal state and save it to a local file named terraform.tfstate. Every change to a .tf file will be compared with the Terraform state to determine what changes need to be made.
Here is an example of a .tfstate file:
{
  "version": 4,
  "terraform_version": "1.8.2",
  "serial": 20,
  "lineage": "",
  "outputs": {},
  "resources": [
    {
      "mode": "managed",
      "type": "latitudesh_project",
      "name": "guide_project",
      "provider": "provider[\"registry.terraform.io/latitudesh/latitudesh\"]",
      "instances": [
        {
          "schema_version": 0,
          "attributes": {
            "created": "2024-05-08T22:16:58+00:00",
            "description": "Terraform Guides example project",
            "environment": "Development",
            "id": "proj_7pWRawmOpNrD6",
            "name": "Terraform Guide",
            "tags": [],
            "updated": "2024-05-09T15:20:57+00:00"
          },
          "sensitive_attributes": [],
          "private": ""
        }
      ]
    }
  ],
  "check_results": null
}
terraform refresh before terraform plan.
If you need more advanced state management, use the terraform state command
to edit it in a more controlled environment.
Migrating your existing Infrastructure
If you already have resources deployed on Latitude.sh, importing them on Terraform is straightforward. Let’s walk through an example:
Creating the .tf file
To start the migration of our infrastructure, let’s initialize a Terraform project in a new directory:
# create a new directory
mkdir latitudesh-infra && cd latitudesh-infra

# create the main file
touch main.tf
# main.tf
terraform {
  required_providers {
    latitudesh = {
      source  = "latitudesh/latitudesh"
      version = "1.1.0" # check the latest version at https://registry.terraform.io/providers/latitudesh/latitudesh/latest
    }
  }
}
export LATITUDESH_AUTH_TOKEN=<YOUR-AUTH-TOKEN> # replace with your actual token
Importing resources
Let’s exemplify the import process with a Project resource.
To begin we’ll need an import block with two attributes
- to: The resource defined inside Terraform that will be used to manage your infrastructure.
- id: The id of the existing resource.
You can find the id of the project in the Home section of the dashboard.
# projects.tf
import {
    to = latitudesh_project.guide_project
    id = "proj_7pWRawmOpNrD6" # replace with the project id you want to import
}

resource "latitudesh_project" "guide_project" {
    name = "Terraform Import Guide"
    environment = "Development"
}
terraform plan should render something like this:
latitudesh_project.guide_project: Preparing import... [id=proj_7pWRawmOpNrD6]
latitudesh_project.guide_project: Refreshing state... [id=proj_7pWRawmOpNrD6]

Terraform used the selected providers to generate the following execution plan. Resource actions are indicated with the following symbols:
  ~ update in-place

Terraform will perform the following actions:

  # latitudesh_project.guide_project will be updated in-place
  # (imported from "proj_7pWRawmOpNrD6")
  ~ resource "latitudesh_project" "guide_project" {
        created     = "2024-05-08T22:16:58+00:00"
      - description = "Terraform Guides example project" -> null
        environment = "Development"
        id          = "proj_7pWRawmOpNrD6"
        name        = "Terraform Guide"
        tags        = []
        updated     = "2024-06-04T22:20:09+00:00"
    }

Plan: 1 to import, 0 to add, 1 to change, 0 to destroy.
# projects.tf
import {
    to = latitudesh_project.guide_project
    id = "proj_7pWRawmOpNrD6"
}

resource "latitudesh_project" "guide_project" {
    name = "Terraform Import Guide"
    description = "Terraform Guides example project"
    environment = "Development"
}
terraform plan again. If everything looks good, run terraform apply to import the resource:
latitudesh_project.guide_project: Preparing import... [id=proj_7pWRawmOpNrD6]
latitudesh_project.guide_project: Refreshing state... [id=proj_7pWRawmOpNrD6]

Terraform will perform the following actions:

  # latitudesh_project.guide_project will be imported
    resource "latitudesh_project" "guide_project" {
        created     = "2024-05-08T22:16:58+00:00"
        description = "Terraform Guides example project"
        environment = "Development"
        id          = "proj_7pWRawmOpNrD6"
        name        = "Terraform Import Guide"
        tags        = []
        updated     = "2024-06-04T22:20:09+00:00"
    }

Plan: 1 to import, 0 to add, 0 to change, 0 to destroy.

Do you want to perform these actions?
  Terraform will perform the actions described above.
  Only 'yes' will be accepted to approve.

  Enter a value:
Finding resources IDs
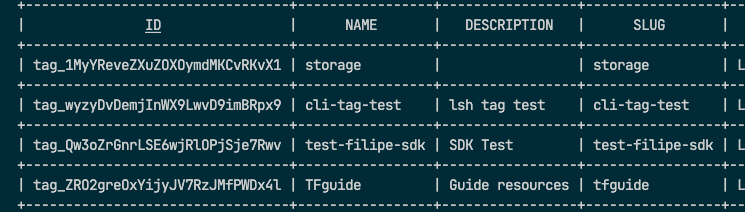
As we’ve seen, it is necessary to pass the ID of the resource to the import block. The fastest way to obtain the IDs is by using our CLI, but you can also find them from the dashboard and API.
To learn how to set up the CLI, see the Latitude.sh CLI documentation page.
After installation, you can use the lsh command in your terminal to access your infrastructure.
For example, to find the IDs of your tags, run lsh tags list.
Importing using for_each
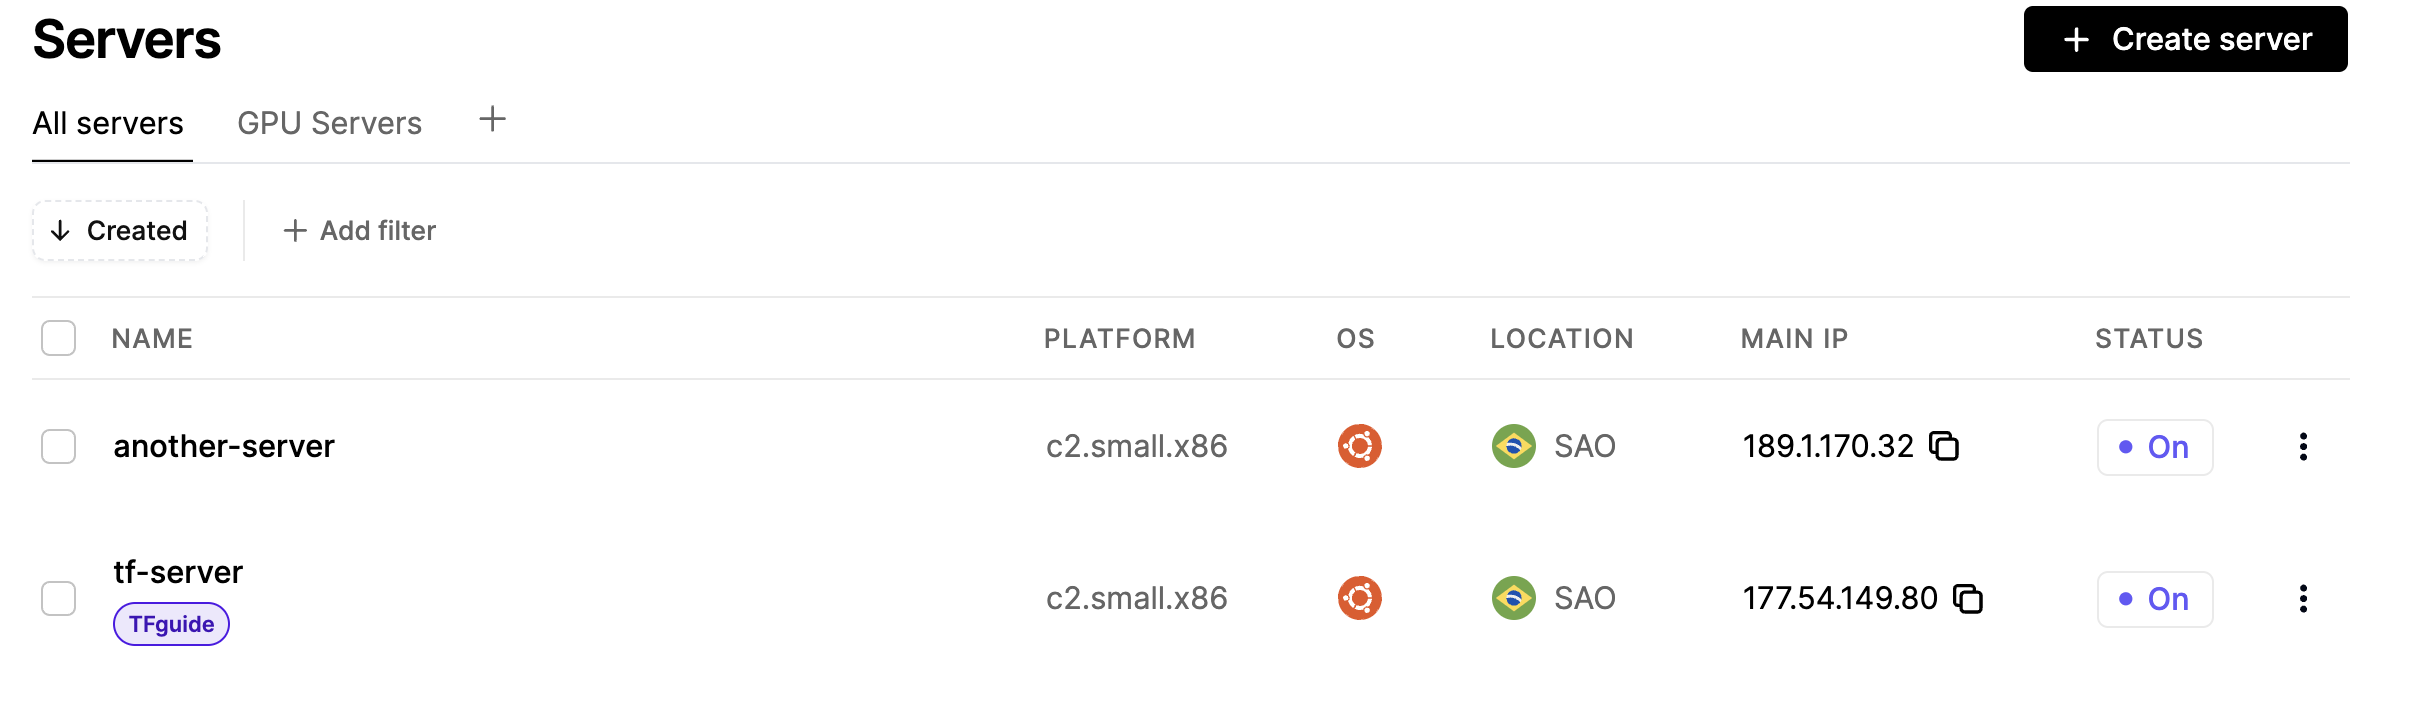
Here we have two servers that we want to import using Terraform’s for_each syntax:
 Create the following file:
# servers.tf
locals {
  servers = {
    "tf-server" = {
        id = "sv_6B9VaLJmZN7vr", # replace with the server id you want to import
        project = latitudesh_project.guide_project.id
        operating_system = "ubuntu_22_04_x64_lts"
        site = "SAO"
        plan = "c2-small-x86"
        tags = [ "tag_mQ1EM1yJ6XIYlO1DKxXpIdevjPP" ] # replace with the tag id you want to import
    },
    "another-server" = {
        id = "sv_7pWRawQkENrD6" # replace with the server id you want to import
        project = latitudesh_project.guide_project.id
        operating_system = "ubuntu_22_04_x64_lts"
        site = "SAO"
        plan = "c2-small-x86"
        tags = []
    },
  }
}

import {
  for_each = local.servers
  id = each.value.id
  to = latitudesh_server.server[each.key]
}

resource "latitudesh_server" "server" {
  for_each = local.servers
  hostname = each.key
  project = each.value.project
  operating_system = each.value.operating_system
  site = each.value.site
  plan = each.value.plan
}
for_each keyword to loop over the objects and get their key-value pair to build our resource. Running terraform apply should import the servers successfully.
Always run terraform plan before applying your changes to verify the changes
that will be made.
Generating Configuration
Terraform allows us to generate the resource based on our import block. Let’s import the rest of our infrastructure.
# import.tf
import {
    to = latitudesh_virtual_network.vlan
    id = "proj_7pWRawmOpNrD6:vlan_dexA0qj36NlQV"
}

import {
    to = latitudesh_vlan_assignment.vlan_assignment
    id = "proj_7pWRawmOpNrD6:vnasg_Yx2za1g9KNVrL"
}

import {
    to = latitudesh_ssh_key.sshkey
    id = "proj_7pWRawmOpNrD6:ssh_MDEOaPmyq0wgB"
}

import {
    to = latitudesh_user_data.user_data
    id = "proj_7pWRawmOpNrD6:ud_owPOapbdNB4xr"
}

import {
    to = latitudesh_tag.guide_tag
    id = "proj_7pWRawmOpNrD6:tag_mQ1EM1yJ6XIYlO1DKxXpIdevjPP"
}
projectID:resourceID. This is needed for nested resources. On the provider documentation, you can verify if a resource is a nested resource or not.
To automatically generate the resource blocks, run:
terraform plan -generate-config-out=generated_resources.tf
generated_resources.tf file with the resource blocks of the remaining infrastructure. Generating configuration is still an experimental feature, and it’s highly encouraged for you to verify the generated resources.
You can edit and organize resources in different files. When you’ve finished verifying the generated resources, run terraform apply to finish your configuration.
Now you know everything needed to import your existing Latitude.sh infrastructure to Terraform.
Happy coding!